Desserts
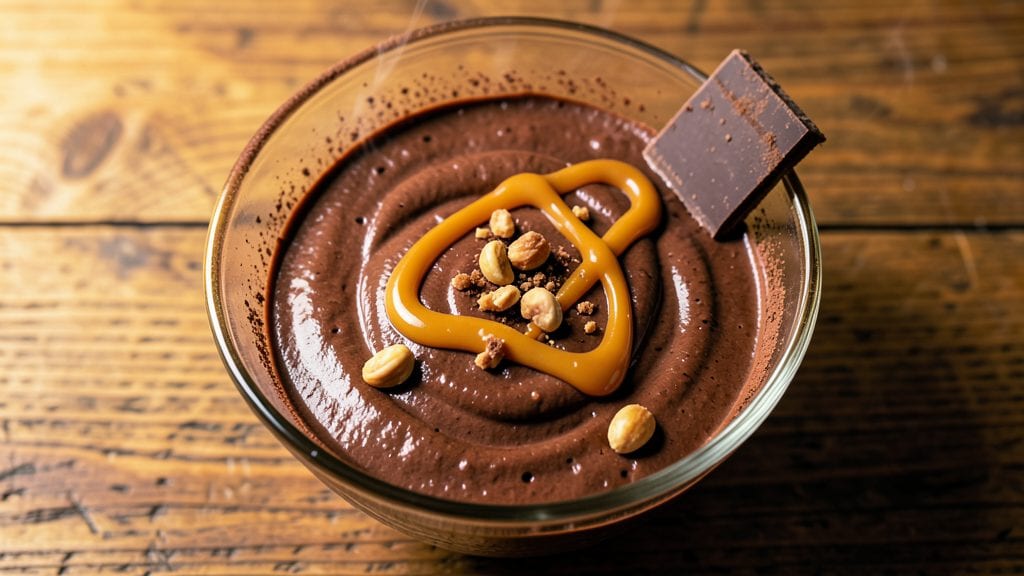
This Nutella chocolate mousse recipe transforms simple ingredients into velvety hazelnut-infused clouds that feel like a decadent dessert. The secret lies in properly tempering the chocolate and folding in whipped cream for that signature airy texture—no special equipment required.
I developed this version after testing countless methods, and it consistently delivers a mousse so light it melts on the tongue while maintaining that rich Nutella flavor. Every bite combines the creamy chocolate base with crunchy topping, creating a perfect balance of textures.
The recipe builds on a classic chocolate mousse foundation but elevates it with the distinctive hazelnut notes from Nutella. We start with high-quality dark chocolate for depth, then incorporate the spread at the perfect moment to infuse that signature flavor without altering the delicate texture.
The key technique involves gently folding in whipped cream to maintain those signature air pockets, ensuring each spoonful feels like a luxurious bite of heaven. Chilling time is critical—too short and it won't set properly; too long and the texture becomes grainy.
What you'll end up with is a dessert that looks as impressive as it tastes: silky smooth chocolate mousse topped with crunchy Nutella shards that add both visual appeal and contrasting texture.
The mousse holds its shape when served but still melts elegantly on your palate, while the topping provides that satisfying crunch with every bite.
This recipe serves four and takes just 20 minutes of active preparation, with the majority of time spent chilling—ideal for special occasions or when you want to impress without spending hours in the kitchen.
The beauty of this recipe lies in its versatility—serve it as-is for a classic presentation, or add fresh berries for color contrast and acidity to cut through the richness. It's vegetarian-friendly but contains dairy, so check your ingredients if you're avoiding lactose.
The method scales easily for larger gatherings, though the texture may vary slightly. Let's create this luxurious dessert that tastes like a professional patisserie creation.
Ingredients for nutella chocolate mousse
Six essential ingredients transform into luxurious Nutella-infused mousse with perfect crunchy contrast.
| Ingredient | Amount | Notes |
|---|---|---|
| High-Quality Dark Chocolate 🍫 | 6 oz | 70% cocoa, chopped finely |
| Nutella Spread 🥜 | ½ cup | Original hazelnut flavor |
| Heavy Whipping Cream 🥛 | 1 ½ cups | Full-fat, cold from fridge |
| Large Egg Yolks 🥚 | 4 whole | Room temperature preferred |
| Granulated Sugar 🍚 | ¼ cup | Superfine preferred for smoothness |
| Vanilla Extract 🌿 | 1 tsp | Pure Madagascar preferred |
| Pinch of Salt 🧂 | ⅛ tsp | Fine sea salt preferred |
| Unsalted Butter 🧈 | 2 tbsp | Room temperature, for topping |
| Crushed Hazelnuts 🌰 | ¼ cup | Toasted, for garnish |
| Fresh Raspberries 🍓 | ½ cup | Optional, for contrast |
The chocolate quality is non-negotiable here—Valrhona or Callebaut 70% cocoa delivers the depth needed to complement Nutella's sweetness. Most specialty grocery stores carry these brands, or check the baking aisle at Whole Foods for pre-chopped options. Nutella's consistency varies by batch; store it in the pantry and use within 6 months for optimal flavor. The heavy cream must be cold—straight from the fridge—to whip properly, and always use full-fat for maximum stability. Egg yolks should be at room temperature to emulsify smoothly, so remove them from the fridge 15 minutes before starting.
No high-quality dark chocolate? Semisweet chocolate chips (60% cocoa or higher) work in a pinch, though the flavor will be less complex. Substituting Nutella? Equal parts hazelnut paste plus cocoa powder mimics the profile, though texture may vary. For dairy-free options, replace the heavy cream with coconut cream (chilled overnight) and use dairy-free butter for the topping. The crushed hazelnuts can be swapped for toasted pecans or walnuts, but hazelnut's distinct flavor is ideal. Fresh raspberries add vibrant color and acidity to cut through the richness—frozen works if thawed and drained.
This mousse requires precise chilling: 4 hours minimum, 6 hours ideal in the fridge for perfect set. Store leftovers in an airtight container with parchment between layers to prevent drying. It keeps for 3 days in the fridge, though texture may slightly soften. For make-ahead convenience, prepare the base 24 hours ahead and add the Nutella just before serving. The whipped cream topping should be added 30 minutes before serving to maintain its airy quality. Freezing isn't recommended as it alters the delicate texture.
Why You'll Love This Recipe
- No Whisk Required: I swear, the only tool you’ll need is a fork—mash the dark chocolate and Nutella together, then fold in the whipped cream. Honestly, it’s the kind of dessert where you’re more likely to burn your hand on the hot stovetop than mess up the texture.
- Rich Without Effort: That velvety contrast? The Nutella’s hazelnut depth cutting through the deep, bittersweet dark chocolate? It’s like someone took all the best parts of a chocolate cake and smooshed them into something lighter than air. (Yes, even on a Tuesday night.)
- Date-Night Ready: Make it ahead, chill it, and serve it in fancy glasses—suddenly, you’re the host of a dessert party. Between us, this is the one I pull out when I want to impress without spending hours in the kitchen. The yolks add that luxurious richness, but you’d never guess it took zero skill.
- Leftovers? Please.: This stuff keeps for days in the fridge, and it only gets better as the flavors meld. I’ll be real: I’ve had it for breakfast the next morning, straight from the jar, and still craved more. The sugar balances the bitterness perfectly, so you’re not stuck with something cloyingly sweet.
Step-by-step instructions for Nutella chocolate mousse
This method delivers silky, hazelnut-infused mousse with a perfect balance of richness and texture.
Melt the Chocolate and Nutella Together
Place the 6 oz high-quality dark chocolate and 0.5 cup Nutella spread in a heatproof bowl set over a saucepan of simmering water, ensuring the bottom of the bowl doesn't touch the water. Stir gently with a silicone spatula until both ingredients melt completely and form a smooth, glossy mixture. This double infusion creates the signature hazelnut-chocolate flavor profile.
Remove the bowl from heat and let the mixture cool to room temperature while you prepare the egg yolks. The chocolate should thicken slightly but remain pourable—this ensures proper incorporation later. If it cools too much, gently rewarm over low heat for 10-15 seconds while stirring constantly.
Temper the Egg Yolks and Sugar
In a separate heatproof bowl, whisk together the 4 whole large egg yolks, 0.25 cup granulated sugar, 1 tsp vanilla extract, and 0.125 tsp pinch of salt over a double boiler. Heat gently while whisking continuously until the mixture reaches 160°F and thickens to a pale ribbon stage—when you draw the whisk through the mixture, the ribbon should hold its shape for 2-3 seconds before dissolving.
Immediately remove from heat and let cool to room temperature while stirring occasionally. This tempering process prevents scrambled eggs and creates a stable base for the mousse. The mixture should thicken noticeably but remain smooth and glossy.
Combine Chocolate and Egg Mixtures
Gradually pour the cooled chocolate mixture into the tempered egg yolk mixture while whisking constantly. This slow combination prevents sudden temperature shifts that could cause the eggs to curdle. Whisk until the mixture is completely smooth and homogeneous—you should see no streaks of chocolate or egg remaining.
Transfer the combined mixture to a clean bowl and cover with plastic wrap, pressing the wrap directly onto the surface to eliminate any air bubbles. Refrigerate for at least 4 hours or until fully chilled and set. This resting period allows the flavors to meld and the texture to develop properly.
Whip the Heavy Cream
While the mousse chills, place the 1.5 cups heavy whipping cream in a chilled bowl and whip with an electric mixer on high speed until soft peaks form. Increase speed to medium-high and continue whipping until the cream reaches stiff peaks—when you lift the beaters, the cream should hold its shape briefly before slowly melting back.
Fold one-third of the whipped cream into the chilled mousse base using a spatula, cutting through the center to incorporate smoothly. This lightens the mixture. Then gently fold in the remaining cream until fully combined. The final texture should be airy and cloud-like, with no visible streaks of cream.
Assemble and Serve
Divide the mousse evenly among 4 serving glasses. Melt the 2 tbsp unsalted butter in a small saucepan over low heat, then drizzle it over each serving. Immediately sprinkle with 0.25 cup crushed hazelnuts and top with 0.5 cup fresh raspberries for color and tart contrast.
Serve immediately for the best texture contrast, or refrigerate for 1 hour before serving if needed. The butter topping adds a luxurious sheen and prevents the mousse from drying out. Each bite should deliver a perfect balance of rich chocolate, nutty hazelnut, and creamy texture with a satisfying crunch from the toasted hazelnuts.
Pro Tips For Making Nutella Chocolate Mousse
- Temper the Chocolate: Melt your dark chocolate gently over a double boiler—never microwave it. I learned this the hard way when my first batch seized up into grainy sludge. Keep the heat low and stir constantly until it’s just smooth enough to coat the back of a spoon, then let it cool slightly before mixing with Nutella.
- Whisk Yolks Cold: Chill your egg yolks in the fridge for 10 minutes before whipping with sugar. Warm yolks turn into scrambled eggs faster than you’d think, and that’s a flavor disaster. Cold yolks emulsify better and give you that silky texture you’re after.
- Fold in the Cream: Use a rubber spatula and work in three batches—don’t dump all the whipped cream in at once. I used to be impatient and overmix, which deflates the air and makes the mousse dense. Gentle folds keep those pockets of air intact.
- Sweeten the Nutella: Add 1-2 teaspoons of extra sugar to the Nutella if your recipe calls for a balanced sweetness. Store-bought Nutella is already loaded with sugar, but the dark chocolate’s bitterness can throw off the flavor if you’re using a high-cocoa percentage bar. Taste as you go.
Serving suggestions for this recipe
Classic Presentation
Serve this Nutella chocolate mousse in elegant glass dessert dishes—I love using 4-ounce champagne coupes for that restaurant-worthy presentation. The deep glasses show off the rich chocolate color while keeping the toppings contained.
For an extra touch, line the bottom with edible gold leaf or dust with cocoa powder before adding the mousse. 💛
Crunchy Toppings
The crushed hazelnuts and butter drizzle are non-negotiable for texture contrast, but you can experiment with other toppings. Try toasted meringue shards for a lighter crunch or dark chocolate shavings using a microplane for an elegant finish.
For a festive touch, add mini marshmallows that caramelize slightly when torched with a kitchen blowtorch.
Fruit Pairings
Fresh berries like raspberries or strawberries cut through the richness beautifully. For a tropical twist, use mango slices or passion fruit pulp drizzled on top. Citrus zest—like orange or lemon—adds a bright contrast that enhances the Nutella's hazelnut flavor. Always add fruit garnishes just before serving to maintain freshness.
Warm Complements
Pair this dessert with espresso or affogato to enhance the chocolate notes. A small cup of hot chai tea with cinnamon complements the Nutella's spiced undertones.
For a boozy pairing, drizzle Baileys Irish Cream over the top or serve with a glass of port wine—the tannins balance the sweetness perfectly.
Make-Ahead Tips
Prepare the mousse base 24 hours ahead and store it in an airtight container with parchment between layers. Add the Nutella and whipped cream 1 hour before serving to maintain texture.
For the toppings, toast hazelnuts fresh or store them in a cool, dark place for up to 1 week. Fresh berries should be added last to preserve their vibrancy. 💫
Dietary Adaptations
For a dairy-free version, use coconut cream (chilled overnight) and dairy-free butter. Replace Nutella with hazelnut paste mixed with cocoa powder. To make it gluten-free, ensure all toppings—like crushed nuts—are certified gluten-free. Always check labels, as Nutella contains trace amounts of wheat from its ingredients.
Nutrition facts
Frequently asked questions
Can I make this mousse without eggs?
This recipe relies on egg yolks for its signature silky texture, but you can substitute with aquafaba (chickpea brine) for a vegan version. Use 1/3 cup aquafaba whipped to stiff peaks, then fold it into the melted chocolate mixture. The texture will be slightly lighter but still delicious. For best results, use a high-powered mixer and add 1 tbsp cornstarch to help stabilize the mousse.
Why did my mousse turn grainy after chilling?
Graininess usually happens when the mixture cools too quickly or isn't properly tempered. Always let the chocolate and egg mixtures cool to room temperature between steps, and whisk vigorously when combining them. If it's already grainy, try blending it briefly with an immersion blender, then re-chill. For future attempts, reduce chilling time slightly (3-4 hours) to prevent over-setting.
How do I make this recipe gluten-free?
Nutella contains trace wheat, but you can make this dessert gluten-free by using certified gluten-free toppings. Replace crushed hazelnuts with gluten-free certified nuts and ensure your chocolate and butter are also labeled gluten-free. The main mousse base remains naturally gluten-free as long as you avoid cross-contamination with wheat-containing ingredients during preparation.
Can I use microwave instead of double boiler?
Yes, but with caution! For the chocolate, melt in 20-second intervals on 50% power, stirring between each interval to prevent overheating. For the egg yolks, use a microwave-safe bowl and heat in 15-second bursts while whisking constantly. Monitor closely—the mixture can curdle quickly if overheated. A double boiler gives you more control for consistent results.
What's the best way to store leftovers?
Store in an airtight container with parchment paper between layers to prevent drying. Keep in the fridge for up to 3 days, though texture may soften slightly. For longer storage, freeze the base (without toppings) for up to 1 month. Thaw overnight in the fridge before adding fresh whipped cream and toppings. Never refreeze once thawed.