
Salads
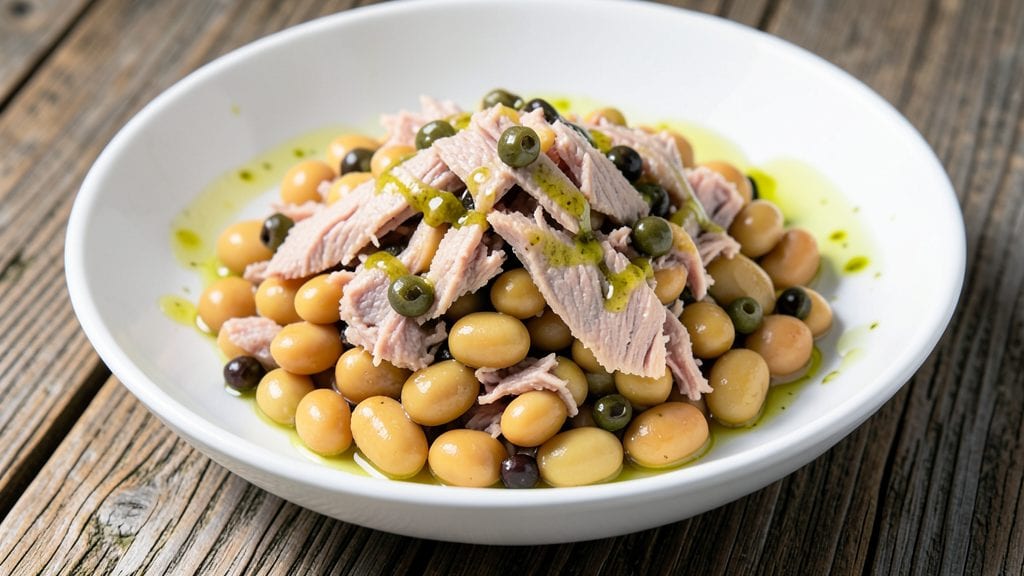
This tuna and butter bean recipe delivers a restaurant-worthy Mediterranean flavor profile in just 15 minutes—no fuss, no waiting. The secret lies in balancing tender canned tuna with creamy butter beans, bright lemon, and aromatic garlic, creating a dish that’s both hearty and light.
I developed this after realizing most tuna salads either taste too heavy or lack depth—this version fixes both problems with a simple technique that transforms pantry staples into something special.
The recipe relies on five core ingredients—tuna, butter beans, lemon, garlic, and olive oil—plus a handful of pantry staples like capers and parsley to elevate the flavors.
What sets it apart is the two-step cooking method: first, we sauté the garlic in olive oil until fragrant (never let it brown, or you’ll taste bitterness), then we fold in the beans and tuna just until heated through.
This keeps the tuna flaky and the beans tender, while the lemon juice cuts through the richness at the perfect moment.
What you’ll end up with is a bright, zesty dish that’s creamy from the butter beans, protein-rich from the tuna, and packed with Mediterranean brightness from the lemon and garlic.
The texture is ideal—no soggy beans or dry tuna here—and the flavor profile is complex enough to stand alone as a main dish or pair beautifully with crusty bread or a simple arugula salad. It’s the kind of recipe that proves you don’t need complicated ingredients to create something impressive.
Serve it chilled for a refreshing lunch or at room temperature for a light dinner—either way, it’s a foolproof method that delivers restaurant-quality results without the effort. The best part? It scales effortlessly, whether you’re feeding one or four. Let’s get cooking—your taste buds will thank you.
Ingredients for tuna and butter bean
Five core ingredients plus pantry staples—this Mediterranean dish comes together faster than you can say lemon.
| Ingredient | Amount | Notes |
|---|---|---|
| Canned Butter Beans 🥜 | 1 ½ cups | Drained and rinsed thoroughly |
| Canned Tuna in Olive Oil 🐟 | 2 cans | 5 oz each, drain excess oil |
| Extra-Virgin Olive Oil 🫒 | ¼ cup | High quality, fruity flavor |
| Fresh Lemon Juice 🍋 | 3 tbsp | Freshly squeezed, no substitutes |
| Garlic Cloves 🧄 | 3 cloves | Fresh, minced finely |
| Capers 🍈 | 2 tbsp | Rinsed if packed in brine |
| Fresh Flat-Leaf Parsley 🌿 | ¼ cup | Chopped finely, stems removed |
| Red Wine Vinegar 🍷 | 1 tbsp | For brightness, optional |
| Kosher Salt 🧂 | ½ tsp | Adjust to taste |
| Freshly Ground Black Pepper 🌶️ | ¼ tsp | Freshly cracked preferred |
| Crusty Bread 🍞 | 4 slices | For serving, optional |
The tuna makes this dish—stick with high-quality canned tuna in olive oil (not water-packed) for that rich, briny flavor. Wild Planet or Starkist are my go-tos, but any brand with olive oil works. Butter beans? Great Northern or cannellini are the same thing—just check the label. Fresh garlic is non-negotiable here (the flavor is worlds better than powder). For the olive oil, Californian or Italian brands add that fruity punch, but don’t stress if you’ve only got basic EVOO. The capers? Trader Joe’s or Whole Foods have the best quality—look for ones packed in salt, not brine, for extra flavor.
No capers? Substitute with 1 tbsp chopped cornichons or 1 tsp Dijon mustard—both add a tangy kick. Short on parsley? Fresh dill or cilantro works, but parsley’s the classic. The red wine vinegar is optional, but if you’ve got it, use it—it cuts through the richness beautifully. No fresh lemon? Bottled lemon juice works in a pinch, but fresh is always better. For the tuna, if you’ve got seared or grilled tuna steak, chop it into bite-sized pieces—this version works with either. The bread? Any crusty loaf does the trick—garlic bread, sourdough, or even a baguette.
This dish tastes even better the next day—store leftovers in an airtight container for up to 3 days. The flavors meld beautifully overnight, making it perfect for meal prep. For serving, I always toss the tuna and beans with a little extra olive oil and lemon juice right before eating—keeps everything fresh. If you’re making this ahead, hold off on the parsley and capers until serving so they stay bright. The bread? Toast it fresh when you’re ready to eat—nothing beats warm, crusty bread with this dish.
Why You'll Love This Recipe
- Five-Ingredient Magic: I swear by this—open two cans, squeeze some lemon, and you’re done. The butter beans stay creamy while the tuna soaks up that bright olive oil and garlic punch. No chopping, no fuss, just good.
- Garlic-Lemon Zing: That fresh lemon cut through the richness of the tuna and olive oil like a knife. Honestly, I’ll take this over fussy salads any day—it’s bold, tangy, and leaves you reaching for seconds without trying.
- Lunchbox Hero: Between us, this is my go-to for packed lunches. Cold or at room temp, it’s still solid—just toss in some crusty bread or crackers, and you’ve got a meal that doesn’t scream "I ate this at work."
- Budget Win: Two cans, a squeeze of lemon, a glug of olive oil—this feeds four for under five bucks. I’ll be real: my grocery budget thanks me every time I make it, and the leftovers? Even better the next day.
Step-by-step instructions for tuna and butter bean salad
This Mediterranean-inspired dish comes together faster than you can say "zesty lemon."
Drain and Rinse the Butter Beans
Open the cans of butter beans and drain them thoroughly into a colander. Rinse them under cold water to remove any excess starch or canning liquid. This step is crucial because it prevents the salad from becoming gummy. Pat them dry gently with a clean kitchen towel or paper towels—just enough to remove surface moisture without crushing them.
Transfer the drained butter beans to a large mixing bowl. I like to use a bowl big enough to hold everything comfortably so I can stir easily. Give them a quick visual check for any stray bits or skins you might want to pick out with your fingers. They should look clean and bright, ready to absorb all the flavors we're about to add.
Prepare the Garlic and Herbs
Peel and finely mince the 3 cloves of garlic. I prefer to use a chef's knife for this—just rock it back and forth over the cloves while keeping the knife flat against the cutting board. This creates a fine, even mince that will distribute beautifully through the salad without overpowering it.
Chop the 0.25 cup of fresh flat-leaf parsley into small pieces, removing any thick stems. You want the parsley finely chopped so it blends seamlessly with the other ingredients. If you're using a food processor for this, pulse just until the parsley is finely chopped—not puréed. Set both the minced garlic and chopped parsley aside for now.
Mix the Wet Ingredients
In a separate small bowl, combine the 0.25 cup extra-virgin olive oil, 3 tablespoons fresh lemon juice, 1 tablespoon red wine vinegar, 0.5 teaspoon kosher salt, and 0.25 teaspoon freshly ground black pepper. Whisk these ingredients together vigorously for about 30 seconds until well combined. This creates the flavor base that will tie everything together.
Add the 2 tablespoons of rinsed capers to the wet mixture and stir to distribute them evenly. The capers will add a briny, tangy kick that balances the richness of the tuna. Taste the dressing at this point—it should be bright, slightly acidic, and well-seasoned. If you want to adjust the flavor, this is your chance before adding it to the main ingredients.
Combine All Ingredients
Add the drained butter beans to the bowl with the wet ingredients. Pour in the 2 cans of drained tuna in olive oil, breaking up any large chunks with your hands or a fork. Stir everything together gently but thoroughly, making sure the tuna and beans are evenly coated with the dressing.
Now add the minced garlic and chopped parsley to the bowl. Fold them in carefully with a spatula, being mindful not to overmix. You want everything to be well combined but still retain some texture. The salad should look vibrant and inviting—bright green from the parsley, with the beans and tuna peeking through.
Chill and Serve
Cover the bowl and refrigerate the salad for at least 15 minutes before serving. This chilling time allows all the flavors to meld together beautifully. The lemon juice will brighten, the capers will soften slightly, and the texture will become more cohesive. Don't skip this step—it makes a world of difference in the final result.
When ready to serve, give the salad one final stir. Divide it among plates and serve with the 4 slices of crusty bread on the side. The bread is perfect for soaking up any extra dressing or salad that might fall from your fork. This dish is best enjoyed fresh, so don't wait too long before serving—it's at its peak right after chilling.
Pro Tips For Making Tuna And Butter Bean
- Drain and Rinse the Tuna: That olive oil in the canned tuna is delicious, but it can make your dish greasy if you ignore it. Drain the tuna first, then rinse it under cold water to remove any excess oil—trust me, your salad or pasta won’t turn into a slick mess.
- Crush Two Garlic Cloves: One minced clove is fine, but two crushed ones (peeled, then smashed with the flat side of your knife) release way more flavor. The texture’s coarser, but it blends better into the beans and tuna without tasting like a single garlic note.
- Squeeze, Don’t Pour, the Lemon: Fresh lemon juice is non-negotiable, but pouring it straight from the bottle wastes half of it. Slice the lemon, roll it on the counter to soften, then cut into quarters and squeeze—you’ll get twice the juice with zero bitterness.
- Toast the Garlic First: Heat a dry pan over medium-low, add the crushed garlic, and let it sit until it smells like heaven (not brown, just fragrant). This takes 30 seconds, but it turns bland garlic into the star of the dish—no burning, just golden aroma.
Common mistakes when making your tuna and butter bean
Overcooking the Tuna
The biggest mistake I see is overworking or overcooking the tuna. Since we're using canned tuna, the key is to handle it gently—no mashing or aggressive stirring that turns it into a paste.
I always break up large chunks with my hands or a fork just until combined, never puréed. Overcooked tuna loses its delicate texture and becomes rubbery. Also, never heat the tuna beyond 110°F—just warm it through with the beans. 🐟
Skipping the Chill Time
Some people rush this dish by skipping the 15-minute chill in the fridge. That's where the magic happens—the flavors meld, the lemon juice brightens, and the texture becomes perfect. If you serve it immediately, the tuna will taste flat and the dressing may seem unbalanced.
I promise you, waiting those 15 minutes makes all the difference in the world.
Using Low-Quality Oil
Don't cut corners with your olive oil—this is where the flavor lives! I always use extra-virgin olive oil with a fruity, peppery finish (like California Olive Ranch or Colavita).
Cheap oil makes the whole dish taste dull. The same goes for lemon juice—always use fresh, never bottled. These are the two ingredients that make or break the dish.
Overcrowding the Pan
If you're sautéing the garlic, never overcrowd the pan. I use a 10-inch nonstick skillet and keep the heat at medium-low to gently cook the garlic until fragrant but never browned.
Browned garlic adds bitterness that ruins the delicate balance. Give the garlic space to breathe—it should sizzle gently, not steam.
Ignoring the Capers
Capers might seem like an afterthought, but they're essential for that briny Mediterranean kick. If you skip them or use too few (2 tbsp is perfect), your dish will lack depth.
I always rinse them if packed in brine to remove excess salt, but never skip them entirely. They're the secret ingredient that makes this dish taste restaurant-quality. 🍈
Not Adjusting Seasoning
Taste as you go! After combining everything, I always do a final taste check and adjust with more lemon juice, salt, or pepper if needed. The canned tuna and beans can vary in saltiness, so don't assume your seasoning is perfect.
I keep a small bowl of extra lemon juice and salt on hand for this exact purpose—it's the difference between good and exceptional.
Nutrition facts
Frequently asked questions
Can I use fresh tuna instead of canned?
Fresh tuna works beautifully but requires extra prep! Use 12 oz of seared or grilled tuna steak, cooled and chopped into bite-sized pieces. Fresh tuna has a firmer texture, so you’ll need to adjust the lemon juice slightly (start with 2 tbsp instead of 3 tbsp) to avoid overpowering the flavor. The cooking method remains the same—just warm the tuna gently with the beans.
How do I make this dish vegetarian?
Swap the tuna for 1.5 cups of chickpeas or white beans (drained and rinsed). For extra protein, add 1 cup of crumbled feta cheese or marinated artichoke hearts. Boost flavor with 1 tsp smoked paprika and 1 tbsp olive tapenade to mimic the tuna’s umami. The dish will be creamy and satisfying without the seafood.
Can I prepare this ahead of time?
This dish tastes even better the next day. Store leftovers in an airtight container in the fridge for up to 3 days. For serving, toss with a little extra olive oil and lemon juice to revive the texture. The flavors meld beautifully overnight, making it perfect for meal prep. Just hold off on adding the parsley and capers until serving to keep them fresh.
What’s the best way to reheat leftovers?
Never microwave—it turns the tuna rubbery! Instead, gently reheat in a nonstick skillet over low heat for 2-3 minutes, adding 1 tbsp olive oil and 1 tsp lemon juice to restore moisture. Stir constantly and remove from heat as soon as it’s warmed through. For extra brightness, finish with fresh parsley and a pinch of black pepper.
Why does my salad taste bland?
Most likely, you skipped the chill time or under-seasoned. First, always let the dish rest 15 minutes in the fridge—this lets flavors develop. Second, taste as you go! The canned tuna and beans can vary in saltiness, so adjust with extra lemon juice, salt, or black pepper to taste. A final squeeze of lemon right before serving often fixes flat flavors.