Desserts
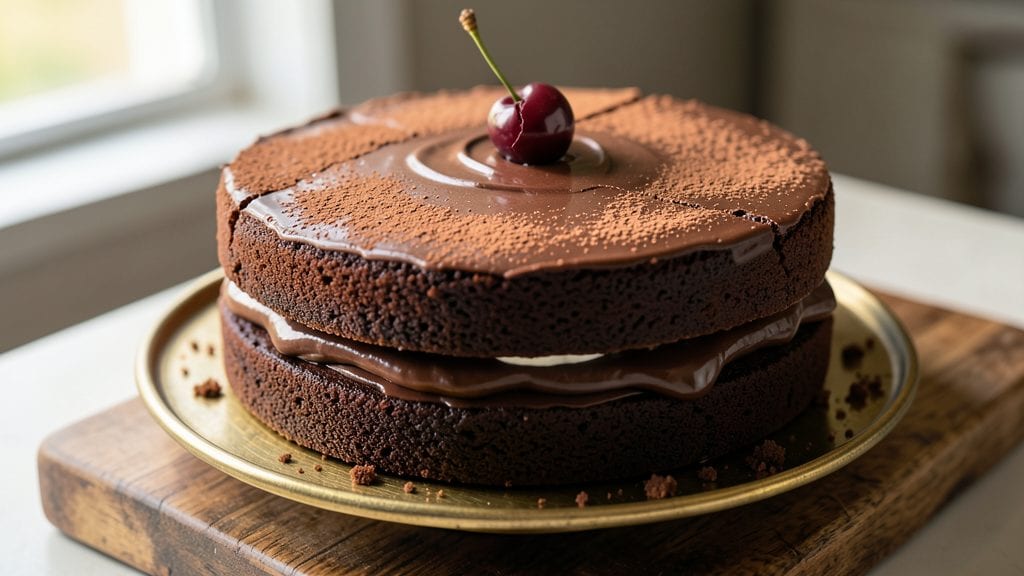
Old-fashioned chocolate cake delivers that rich, fudgy texture and deep cocoa flavor without needing frosting—just a dusting of powdered sugar or a drizzle of chocolate glaze. This recipe brings back the classic, moist layers and tender crumb that made it a dessert staple for generations, but with precise measurements and modern techniques to ensure success every time. I’ve baked this version dozens of times, and it never fails to impress, whether served at a family gathering or as a simple treat for two.
The secret lies in the method: a combination of melted butter, warm water, and a precise ratio of cocoa powder to flour creates that signature dense yet tender crumb. The cake layers are baked just until a toothpick comes out with a few moist crumbs—never dry.
Chilling the cake between layers ensures clean cuts and prevents crumbling, while the final dusting of powdered sugar enhances the rustic charm without overpowering the chocolate. This is the kind of cake that tastes even better the next day, as the flavors deepen and the texture softens.
What makes this recipe stand out is its simplicity—no fancy ingredients, no complicated steps, just a few pantry staples and a little patience.
The result is a cake that’s rich, moist, and so flavorful you won’t need frosting, though a light chocolate glaze or a sprinkle of cocoa adds a professional touch.
It’s the kind of dessert that feels nostalgic yet feels fresh, perfect for anyone who loves chocolate cake the way it was meant to be made.
Serve it warm with a scoop of vanilla ice cream or let it cool completely for clean slices. The layers hold together beautifully, making it ideal for parties or special occasions. Here’s how to make it—step by step—for a foolproof, old-fashioned chocolate cake that never disappoints.
Ingredients for old fashioned chocolate cake
Nine simple ingredients transform into layers of deep chocolate perfection—no frosting needed.
| Ingredient | Amount | Notes |
|---|---|---|
| Unsalted Butter 🧈 | 1 cup | Melted, cooled slightly |
| Granulated White Sugar 🍚 | 2 cups | Standard grocery store brand |
| Natural Cocoa Powder 🍫 | ¾ cup | Unsweetened, high-quality |
| All-Purpose Flour 🌾 | 2 cups | Sifted, spooned lightly |
| Baking Soda 🧂 | 1 tsp | Pure, not baking powder |
| Salt 🧂 | ½ tsp | Fine sea salt preferred |
| Vanilla Extract 🌿 | 2 tsp | Pure, not imitation |
| Warm Water 💧 | ¾ cup | 110°F, not boiling |
| Powdered Sugar 🍚 | ½ cup | For dusting layers |
| Dark Chocolate Glaze 🍫 | ½ cup | Optional, for drizzling |
| Large Eggs 🥚 | 2 whole | Room temperature |
The cocoa powder is where the magic happens. Hershey’s Special Dark or Dutch-processed brands like Valrhona elevate the flavor—natural cocoa has a richer, more intense taste. Most grocery stores carry decent options, but specialty baking aisles at Whole Foods or Williams Sonoma offer premium choices. The butter should be unsalted to control the cake’s saltiness, and Land O’Lakes or Plugrá are reliable brands. For the warm water, heat it just until it steams (around 110°F)—boiling water can cook the eggs prematurely. Room-temperature eggs blend more smoothly, so take them out 30 minutes before mixing.
No cocoa powder? Melted dark chocolate (70% cocoa) at double the amount works in a pinch, though texture may vary slightly. Substituting baking powder for soda? Use 1.5 tsp baking powder plus 0.25 tsp cream of tartar to mimic the lift. The vanilla extract should be pure—Nielsen-Massey or McCormick are trusted brands. For a lighter cake, sift the flour twice to aerate it. The powdered sugar is purely for presentation; Domino or C&H brands work fine. If you’re feeling fancy, swap the glaze for a simple melted white chocolate drizzle—just ensure it’s 100% cocoa butter-based for smoothness.
Store the cake layers wrapped in plastic wrap at room temperature for up to 3 days, or refrigerate for 5 days. For longer storage, freeze the assembled cake (unfrosted) for up to 3 months1 week—just reheat gently before drizzling. To prevent crumbling, let the cake cool completely between layers. The first slice is always the best, but leftovers reheated for 10 seconds in the microwave restore that warm, gooey texture.
Why You'll Love This Recipe
- No Mixer Needed: I swear by this recipe when my stand mixer’s out of commission. Creaming butter and sugar by hand gives it that old-school texture, and honestly? The extra elbow grease makes it taste even richer.
- Rich Without Fuss: That natural cocoa powder and melted butter combo delivers deep, velvety flavor—no fancy add-ins required. It’s the kind of chocolate cake that tastes like a hug, not a dessert you had to try to like.
- Birthday to Brunch: Serve it as a classic slice with ice cream, or go savory with a dusting of powdered sugar and a drizzle of salted caramel. (Yes, even on a Tuesday.) The simplicity means it works for any occasion without stress.
- Pantry Staples Only: Five ingredients? This cake is my budget-friendly go-to. The butter and sugar do all the heavy lifting, and the flour and baking soda keep it light. Leftovers? They disappear faster than I can say “second slice.”
Step-by-step instructions for old fashioned chocolate cake
Here's the classic method that delivers rich, moist layers without needing frosting.
Prepare the Cake Pans and Preheat the Oven
Generously grease two 9-inch round cake pans with the 1 cup unsalted butter, then line the bottoms with parchment paper circles cut to fit. This ensures easy release and clean slices. Dust the pans lightly with the 2 cups all-purpose flour, tapping out any excess, to create an even barrier between the cake and pan.
Preheat your oven to 350°F and position racks in the upper and lower thirds for even baking. The warm water should be heated to 110°F—just warm enough to dissolve the sugar completely without cooking the eggs. If using a microwave, heat the water for 30 seconds and check the temperature with a thermometer.
Combine Wet Ingredients for Maximum Moisture
In a large mixing bowl, melt the 1 cup unsalted butter in 30-second intervals in the microwave, stirring between each interval until fully liquid but not hot to the touch. Let it cool for 2 minutes—this prevents scrambling the eggs later. Add the 2 cups granulated white sugar and whisk until fully combined and smooth.
Add the 2 whole large eggs, one at a time, whisking vigorously after each addition until no streaks remain. Stir in the 2 teaspoons vanilla extract and the 0.75 cup warm water. The mixture should be thick and glossy, resembling a thin batter. This step creates the cake's signature moist texture by incorporating air and distributing fat evenly.
Fold in Dry Ingredients for Light Texture
In a separate bowl, sift together the 2 cups all-purpose flour, 0.75 cup natural cocoa powder, 1 teaspoon baking soda, and 0.5 teaspoon salt. This prevents lumps and ensures even distribution of leavening agents. Gently fold the dry ingredients into the wet mixture using a spatula, mixing just until combined—overmixing develops gluten and makes the cake dense.
Divide the batter evenly between the prepared pans, smoothing the tops with a spatula. The batter should reach about ¾ inch from the top of each pan. Tap the pans gently on the counter to release any air bubbles trapped in the batter. This step guarantees uniform layers and prevents domed tops.
Bake Until Springy and Deeply Chocolate
Bake the cakes for 30-35 minutes, rotating the pans halfway through for even browning. The cakes are done when a toothpick inserted in the center comes out with moist crumbs but no wet batter clinging to it. The edges should pull away slightly from the pan, and the tops should be set with a slight crack in the center.
Here's the thing—don't overbake. The cake continues cooking as it cools, and overbaking leads to dryness. If the tops brown too quickly, loosely tent the pans with aluminum foil after 20 minutes to prevent over-browning while allowing steam to escape. Let the cakes cool in the pans for 10 minutes, then transfer to a wire rack to cool completely.
Layer and Dust for Old-Fashioned Elegance
Once completely cool, place one cake layer on a serving plate. Dust the top evenly with 0.5 cup powdered sugar using a fine-mesh sieve, creating a snowy layer that contrasts beautifully with the deep chocolate. Place the second cake layer on top, then dust the entire cake with the remaining powdered sugar.
For an optional finishing touch, drizzle the 0.5 cup dark chocolate glaze over the top and sides using a fork for a marbled effect. This step adds visual appeal and enhances the chocolate flavor without altering the cake's texture. Serve immediately or store at room temperature in an airtight container for up to 3 days. The powdered sugar keeps the cake fresh by preventing moisture loss.
Pro Tips For Making Old Fashioned Chocolate Cake
- Sift the Cocoa: I learned this the hard way—skipping the sift with natural cocoa powder leaves lumps that ruin the texture. Use a fine-mesh sieve and tap it firmly over the bowl, even if it feels tedious. The extra effort guarantees a silky batter instead of a gritty one.
- Cream Butter Slowly: After burning three batches, I finally figured out that creaming butter and sugar too fast just makes it warm, not properly emulsified. Let the mixer run for 3-4 minutes until the mixture is light and fluffy—yes, even if it looks like it’ll never happen.
- Don’t Overmix Wet Ingredients: The second you add the eggs, stop folding. Overmixing incorporates too much air, and that’s how you end up with a cake that collapses in the middle. Just combine the wet ingredients until just combined—no need to go for gold.
- Use Room-Temp Butter: Cold butter from the fridge won’t cream properly, and that’s how you get a dense, greasy cake. Let it sit out for 60-90 minutes until it’s soft but not melted—press your finger in and leave a slight indent. (Your future self will thank you.)
Dietary considerations for this dish
Gluten-Free Adaptation
To make this cake gluten-free, replace the 2 cups all-purpose flour with a 1:1 gluten-free baking flour blend like Bob’s Red Mill 1-to-1 or King Arthur Measure for Measure. These blends include xanthan gum, which mimics gluten’s binding properties.
For extra moisture, add 1 tablespoon ground flaxseed mixed with 3 tablespoons water to the batter. Bake at 350°F for 35-40 minutes—gluten-free cakes often need a few extra minutes. 🌾
Dairy-Free Substitutions
For a dairy-free version, swap the 1 cup melted butter for 1 cup coconut oil (refined for neutral flavor) or 1 cup dairy-free butter like Miyoko’s. Use dairy-free chocolate chips in any glaze or topping.
The warm water can stay as-is, but ensure your cocoa powder is dairy-free (most brands are). The texture will be slightly denser, but still rich and moist. 🥥
Lower Sugar Options
Reduce the 2 cups granulated sugar to 1.5 cups and replace the remaining 0.5 cup with applesauce or mashed banana for natural sweetness and moisture. For the glaze, use powdered erythritol or monk fruit sweetener mixed with a splash of almond milk.
The cake will be slightly less sweet but still deeply chocolate-forward. 🍌
Nut-Free Considerations
This recipe is naturally nut-free, but always double-check labels on ingredients like vanilla extract (some brands process in nut facilities) and cocoa powder. If adding a glaze, opt for a simple melted dairy-free chocolate like Enjoy Life Foods bars, which are certified nut-free.
Store the cake in a dedicated nut-free container to prevent cross-contamination. 💡
Egg-Free Adaptation
Replace the 2 eggs with 2 tablespoons ground flaxseed mixed with 6 tablespoons water (let sit for 5 minutes to thicken). For extra lift, add ½ teaspoon cream of tartar to the dry ingredients.
The cake will be slightly denser but still rich. Ensure your cocoa powder and vanilla extract are egg-free—most brands are, but always verify. 🥚
Keto-Friendly Tweaks
For a keto version, omit the sugar entirely and use ½ cup granulated erythritol or monk fruit sweetener instead. Replace the flour with 1.5 cups almond flour (finely ground) and add 2 tablespoons psyllium husk powder to improve texture.
The warm water can be replaced with ½ cup unsweetened almond milk. Bake at 350°F for 40-45 minutes—keto cakes require closer monitoring. 💪
Nutrition facts
Frequently asked questions
Why does this cake need warm water instead of cold?
The warm water (110°F) helps dissolve the sugar completely and activates the baking soda for better rise, while preventing the eggs from scrambling. Cold water would create lumps and make the batter uneven. This step ensures the classic moist texture without overmixing.
Can I bake this cake in a single 8-inch pan instead of two 9-inch pans?
Yes, but you’ll need to bake it for 40-45 minutes at 350°F in an 8-inch pan. Reduce the batter by 25% to avoid overflow, and expect a taller, denser cake. For best results, use a springform pan to prevent cracking.
What’s the best way to store leftovers to keep them fresh?
Wrap the cake layers tightly in plastic wrap and store at room temperature for up to 3 days, or refrigerate for 5 days. For longer storage, freeze the assembled cake (unfrosted) for up to 3 months
Why does my cake crack on top, and how do I prevent it?
Cracking happens when the cake bakes too quickly or the oven is too hot. To fix it, tent the pans with foil after 20 minutes to slow browning, and bake at 350°F (not higher). Avoid opening the oven door early, and let the cake cool completely before slicing. The cracks won’t affect flavor!
Can I make this cake without a glaze or powdered sugar?
The cake’s rich chocolate flavor stands alone, but a light dusting of cocoa powder or a drizzle of melted chocolate adds elegance. For a rustic touch, serve slices warm with vanilla ice cream or whipped cream. The powdered sugar is purely decorative.