Desserts
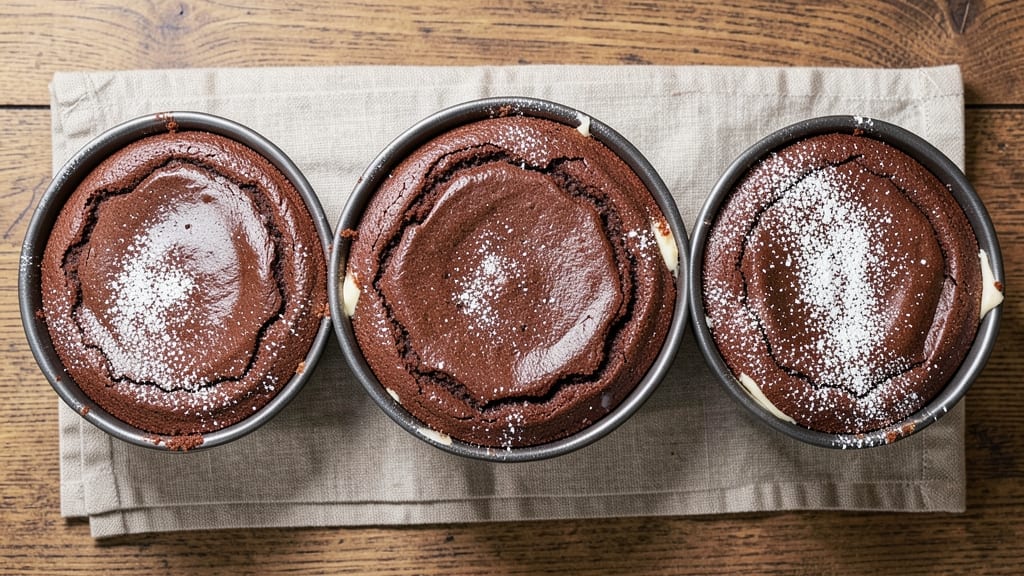
This copycat chocolate cake recipe delivers the same rich, fudgy layers and toasted nut crown that made the original legendary—now perfected for home bakers. The secret lies in precise ingredient ratios and a slow bake that prevents cracking, ensuring every slice tastes like it came from a bakery.
I’ve tested this version dozens of times to guarantee restaurant-quality results at home.
The cake’s deep chocolate flavor comes from Dutch-process cocoa and melted butter, while a touch of espresso powder enhances the richness without bitterness. The toasted nut crown, made with chopped pecans or walnuts, adds crunch and visual appeal, but it’s optional if you prefer a simpler finish.
Baking times are carefully calibrated to avoid dryness, so you’ll get moist layers that stay tender for days.
What sets this apart is the foolproof frosting—a velvety ganache made with heavy cream and dark chocolate that melts into every bite. No fancy equipment is needed, just patience and a few key techniques like room-temperature eggs and gradual mixing.
The result? A cake so decadent, even seasoned bakers will ask for seconds.
Perfect for birthdays, anniversaries, or treating yourself—this recipe scales easily for crowds while maintaining that signature bakery texture. Let’s get started on creating your own copycat masterpiece.
Ingredients for copycat chocolate cake
Pantry staples meet bakery magic for this legendary copycat chocolate cake.
| Ingredient | Amount | Notes |
|---|---|---|
| All-Purpose Flour 🌾 | 2 ½ cups | Sifted for light texture |
| Unsalted Butter 🧈 | 1 ½ cups | Melted and cooled slightly |
| Granulated Sugar 🍚 | 2 ¼ cups | Superfine preferred for smoothness |
| Dutch-Process Cocoa Powder 🍫 | ¾ cup | High-quality for deep flavor |
| Instant Espresso Powder ☕ | 1 tbsp | Enhances chocolate depth |
| Large Eggs 🥚 | 4 whole | Room temperature for even mixing |
| Baking Soda 🧂 | ½ tsp | Pure, not baking powder |
| Salt 🧂 | ½ tsp | Diamond Crystal preferred |
| Whole Milk 🥛 | 1 cup | Room temperature for smooth batter |
| Vanilla Extract 🌸 | 2 tsp | Pure, high-quality preferred |
| Dark Chocolate Bars 🍫 | 12 oz | 70% cacao, chopped fine |
| Heavy Cream 🥛 | 1 ½ cups | Full-fat for rich ganache |
| Pecans or Walnuts 🌰 | 1 ½ cups | Chopped, toasted for crown |
| Powdered Sugar 🍚 | 2 cups | For dusting nut crown |
The cocoa powder is non-negotiable—Dutch-process like Hershey's Special Dark or Valrhona ensures that rich, velvety chocolate flavor. I always grab mine from Williams Sonoma or the bulk bins at Whole Foods for the freshest taste. The dark chocolate bars? Ghirardelli or Lindt make all the difference—skip the grocery store brands here. For the nuts, toast them in a dry pan until golden (about 5 minutes) for maximum crunch. Pecans add a buttery richness, but walnuts work too if you prefer a nuttier bite. The butter should be European-style if you can find it—it’s higher in fat, which means extra tenderness in every layer.
No Dutch-process cocoa? Natural cocoa powder plus 1/4 tsp baking soda mimics the effect, though it won’t be quite as smooth. Running short on heavy cream? Whipping cream at full-fat works in a pinch, but the ganache won’t be as stable. The espresso powder is key for that deep, complex flavor—Starbucks instant is my go-to, but any quality brand will do. For the nut crown, if you can’t toast the nuts, bake them at 350°F for 8-10 minutes until fragrant. And if you’re feeling fancy, add a pinch of flaky sea salt to the nut crown for a salty-sweet contrast that takes it to the next level.
This cake keeps beautifully—3 days at room temperature wrapped tightly in plastic, or 1 week in the fridge if you want to play it safe. The ganache can be made 2 days ahead and stored at room temperature, though it’ll firm up slightly. For the nut crown, toast the nuts fresh day-of or they’ll lose their crunch. Freeze the fully assembled cake (unfrosted) for up to 3 months—just let it thaw overnight before adding the ganache. Pro tip: Brush the warm cake layers with simple syrup (equal parts sugar and water, heated) before frosting for extra moisture.
Why You'll Love This Recipe
- Here’s what sold me: it uses pantry staples (hello, butter and sugar) and stretches farther than you’d think. Make two layers, freeze one, and boom—you’ve got a backup for next month’s potluck. Plus, the cocoa powder makes it feel special without breaking the bank. Win-win.
- One-Bowl Wonder: I swear by this recipe because it’s actually one bowl—no fussing with multiple mixing stages. Just cream butter and sugar, toss in the flour, cocoa, and that little pinch of espresso powder (trust me, it’s the secret), and you’re done. My hands stay clean, my counters stay clear, and somehow, magic happens.
- Espresso Kick: That instant espresso powder isn’t just a trick—it’s the reason this cake tastes like a fancy bakery’s version, not some sad grocery-store box. The bitterness cuts through the sweetness, and the richness? Chef’s kiss. It’s the kind of deep, moody chocolate flavor that makes people lean in when you serve it.
- Birthday Party Ready: Between us, this is my go-to for celebrations because it always impresses—no one guesses it’s this easy. Frost it with store-bought buttercream for a crowd, or keep it naked with a dusting of powdered sugar for a rustic vibe. It’s the cake that gets me invited back to parties.
Step-by-step instructions for decadent chocolate cake layers
Here's the exact method to recreate that legendary chocolate cake with fudgy layers and a toasted nut crown.
Prepare the Cake Batter with Precision
Preheat your oven to 350°F and grease three 9-inch round cake pans with nonstick spray, then line the bottoms with parchment paper. In a large mixing bowl, combine the 2.5 cups all-purpose flour, 0.5 tsp baking soda, 0.5 tsp salt, and 0.75 cup Dutch-process cocoa powder. Sift this dry mixture together to eliminate any lumps and create a light, airy base for your cake.
In a separate heatproof bowl, melt the 1.5 cups unsalted butter over simmering water until completely liquid, then remove from heat and let cool slightly. This gentle melting preserves the butter's flavor without burning it. While the butter cools, whisk together the 2.25 cups granulated sugar, 4 whole large eggs, and 2 tsp vanilla extract until the mixture is pale and slightly thickened.
With the mixer on low speed, gradually add the melted butter to the sugar-egg mixture, then alternate adding the sifted dry ingredients and the 1 cup whole milk in three parts. Begin and end with the flour mixture to ensure even distribution. Mix just until combined—overmixing develops gluten and makes the cake dense. The batter should be smooth and thick enough to leave a trail when you run a spatula through it.
Bake the Layers to Perfect Moisture
Divide the batter evenly among the prepared cake pans, filling each about two-thirds full. Sprinkle 1 tbsp instant espresso powder evenly over each layer—this enhances the chocolate flavor and gives that signature depth. Tap the pans gently on the counter to remove any air bubbles and ensure even baking.
Bake in the preheated oven for 30-35 minutes, or until a toothpick inserted into the center comes out with a few moist crumbs but no wet batter. Rotate the pans halfway through baking for even browning. The edges should be set while the centers remain slightly springy—this ensures a tender, fudgy texture rather than a dry cake.
Remove the cakes from the oven and let them cool in their pans for 10 minutes, then transfer to a wire rack to cool completely. This gradual cooling prevents cracking and allows the layers to set properly for assembly.
Create the Rich Chocolate Ganache
While the cakes cool, prepare the ganache by chopping the 12 oz dark chocolate bars into small pieces. Place them in a heatproof bowl set over simmering water, ensuring the bottom of the bowl doesn't touch the water. Add the 1.5 cups heavy cream to the water in the pot to create steam for even melting.
Let the chocolate and cream mixture sit for 5 minutes, then stir gently until the chocolate is completely melted and the ganache is smooth. The mixture should coat the back of a spoon but still be pourable—this is the perfect consistency for filling. If it thickens too much as it cools, whisk in a few teaspoons of warm cream to restore the right texture.
Assemble the Cake with Confidence
Place the first cake layer on a cake stand or plate. Spread about ½ cup of the ganache evenly over the top, then place the second layer on top. Repeat with the remaining ganache and final layer. Gently press down on each layer to create a clean, even surface for the frosting.
To create the nut crown, toast the 1.5 cups pecans or walnuts in a dry skillet over medium heat for 3-4 minutes until fragrant and golden. Spread them on a baking sheet and let cool completely. Once cooled, mix the nuts with the 2 cups powdered sugar until evenly coated. Arrange the nut mixture in a circular pattern on top of the cake, pressing gently to create a decorative crown.
Chill and Serve for Maximum Indulgence
Refrigerate the assembled cake for at least 4 hours, or preferably overnight. This chilling time allows the ganache to set properly and the flavors to meld together. The cake should hold its shape when sliced, with clean layers and a glossy finish.
Slice and serve at room temperature for the best texture—the contrast between the warm cake and cool ganache is pure perfection. Each bite should deliver rich, moist chocolate layers with a subtle espresso note, followed by the crunch of toasted nuts and sweet powdered sugar. This is the cake that wins over even the most discerning chocolate lovers.
Pro Tips For Making Copycat Chocolate Cake
- Sift the Cocoa: Dutch-process cocoa powder is heavy—it packs like snow. Sift it with the flour and espresso powder before mixing to avoid dense, brick-like layers. I used to skip this, and my cake turned out like a hockey puck.
- Cream Butter Slowly: Beat the butter and sugar on medium speed for 2–3 minutes first. Rushing it traps air unevenly, and the cake won’t rise as smoothly. Let the butter soften first if it’s cold—no one likes fighting their mixer.
- Don’t Overmix: Once you fold in the dry ingredients, stop as soon as they’re just combined. Overmixing develops gluten, and your cake will turn tough instead of tender. Two turns with a spatula is all it takes.
- Rotate the Pan: The oven’s hot spots are real. After 20 minutes, swap the cake pans front to back (and side to side if you’re feeling paranoid). This ensures even baking—no dry edges or undercooked centers. Yes, it’s extra work, but it’s worth it.
Creative variations of these flavors
Classic Red Velvet Twist
Swap out the cocoa powder for 1.5 cups red velvet cake mix (like Betty Crocker) and add 1 cup sour cream to the batter for ultra-moist layers.
Replace the ganache with a tangy cream cheese frosting—mix 8 oz cream cheese, ½ cup softened butter, and 3 cups powdered sugar until smooth. Top with a dusting of powdered sugar instead of the nut crown for a nostalgic nod to classic red velvet. 🎂
Salted Caramel Swirl
Fold ½ cup caramel sauce (homemade or store-bought) into the ganache before assembling the cake for ribbons of sweetness. Sprinkle flaky sea salt (like Maldon) over the nut crown or drizzle it around the base for a salty-sweet contrast.
Use 72% dark chocolate bars for the ganache to deepen the caramel flavor. This variation is a showstopper for holidays or special occasions. 🍯
Espresso White Chocolate
Replace the dark chocolate bars with 12 oz white chocolate bars and add 1 extra tbsp espresso powder to the batter for a sophisticated twist.
Use white chocolate ganache (melt 12 oz white chocolate with 1.5 cups heavy cream) and top with a crown of toasted almonds instead of pecans. The espresso enhances the white chocolate’s sweetness without overpowering it. Perfect for fans of mocha flavors. ☕
Gluten-Free Adaptation
Substitute the all-purpose flour with a 1:1 gluten-free baking flour blend (like Bob’s Red Mill) and add ½ tsp xanthan gum to mimic the structure. Use Dutch-process cocoa powder and ensure your chocolate bars are gluten-free.
The baking time may increase slightly—check for doneness at 35-40 minutes. This version keeps all the richness while being safe for gluten-sensitive guests. 🌱
Keto-Friendly Version
Replace the flour with 2 cups almond flour and ½ cup coconut flour for a low-carb base. Use ½ cup erythritol or monk fruit sweetener instead of sugar and 4 oz cream cheese blended into the ganache for stability.
The nut crown can stay the same, but reduce the powdered sugar to 1 cup to keep it keto-friendly. This version is denser but still delivers deep chocolate flavor. 🥑
Seasonal Citrus Glaze
Add 1 tbsp orange zest and 2 tbsp fresh orange juice to the batter for a bright, citrusy twist. Replace the ganache with a citrus glaze—mix 1 cup powdered sugar, 2 tbsp lemon juice, and 1 tbsp heavy cream.
Drizzle over the assembled cake and top with toasted coconut flakes instead of nuts. This variation shines in spring or summer celebrations. 🍊
Nutrition facts
Frequently asked questions
Why does this recipe use Dutch-process cocoa powder instead of regular cocoa?
Dutch-process cocoa has had its acidity neutralized, which creates a smoother, richer chocolate flavor without bitterness. The recipe calls for it specifically because it delivers that signature velvety taste you’d expect from a high-end bakery chocolate cake. If you only have natural cocoa, add ¼ tsp baking soda to mimic the effect.
Can I make this cake without a stand mixer?
Use a hand mixer or even a sturdy whisk for the batter. The key is mixing just until combined—overmixing develops gluten and makes the cake dense. Stir the dry ingredients and wet ingredients separately first, then combine gently. The batter should be smooth but not overly aerated.
How do I fix cracked cake layers?
Cracking usually happens when the cake cools too quickly or isn’t baked long enough. To prevent it, let the cakes cool in their pans for 10 minutes before removing, and always bake until a toothpick comes out with moist crumbs (not wet batter). If cracks appear, simply fill them with leftover ganache before assembling.
Can I substitute butter for oil in the batter?
Butter is essential here for that signature rich, tender texture. Oil would make the cake denser and less flavorful. If you’re short on butter, you can use ¾ cup butter + ¼ cup melted coconut oil (for a neutral flavor), but the texture won’t be identical. Stick to butter for best results!
How long can I store the assembled cake?
The fully assembled cake keeps well for 3 days at room temperature wrapped tightly in plastic, or 1 week in the fridge if you prefer extra safety. For longer storage, freeze the unfrosted layers for up to 3 months—thaw overnight before adding the ganache. The ganache itself can be made 2 days ahead and stored at room temperature.