
Desserts
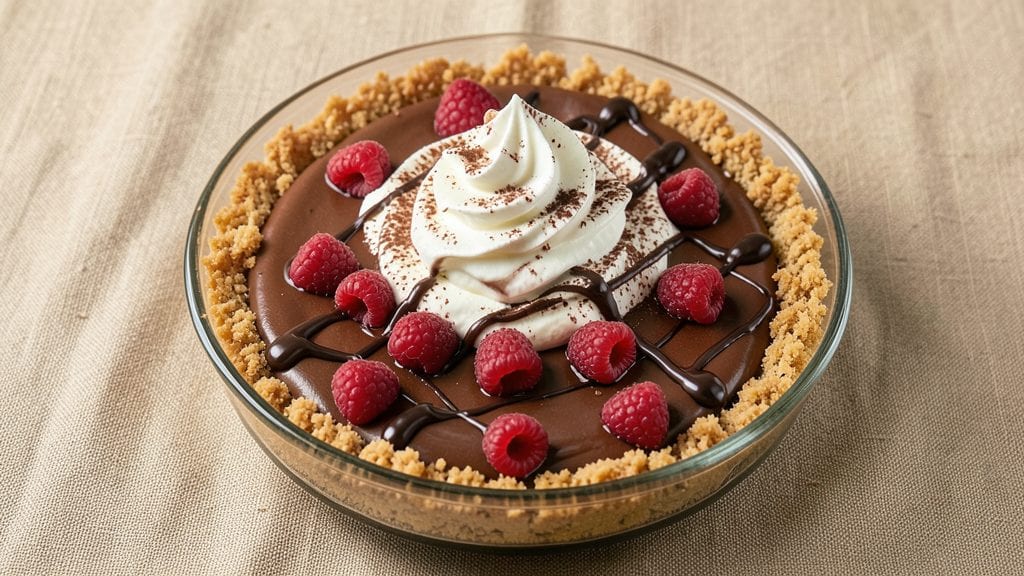
Creating a Philadelphia cream cheese chocolate pie that’s rich, velvety, and effortlessly elegant has been my go-to dessert for holiday gatherings and impromptu celebrations alike. The secret lies in balancing the tangy creaminess of Philadelphia cream cheese with the deep, decadent flavor of chocolate ganache—without requiring a single oven step.
This recipe delivers restaurant-quality results with just a few simple ingredients and minimal effort, perfect for anyone who wants to impress without stress.
The foundation of this pie is a no-bake crust, which can be customized to your preference—whether you opt for a classic graham cracker base or a buttery pie dough for extra flakiness.
The filling combines whipped cream cheese with melted chocolate and a touch of vanilla, creating a smooth, swirled texture that’s both luxurious and foolproof. No special equipment is needed, just a few mixing bowls and a little patience for the ganache to set.
By the time you’re done, you’ll have a pie with silky layers of cream cheese and chocolate, cooled to perfection and ready to slice. The contrast between the cool, creamy filling and the rich, dark chocolate creates a flavor profile that’s impossible to resist.
It’s the kind of dessert that feels indulgent yet effortless—ideal for feeding a crowd or treating yourself after a long week.
This pie keeps beautifully in the refrigerator for up to five days, making it perfect for meal prep or gifting. Serve it chilled with a dusting of cocoa powder or fresh berries for added flair. Let’s get started on this crowd-pleaser!
Ingredients for philadelphia cream cheese chocolate pie
Rich cream cheese meets velvety chocolate—just eight ingredients for a no-bake pie crowd will adore.
| Ingredient | Amount | Notes |
|---|---|---|
| Philadelphia Cream Cheese 🧀 | 16 oz | Full-fat, room temperature |
| Dark Chocolate Bars 🍫 | 12 oz | Semisweet or bittersweet, 60-70% cacao |
| Heavy Whipping Cream 🥛 | 1 ½ cups | Cold, full-fat for stability |
| Granulated Sugar 🍚 | ½ cup | Fine for smooth texture |
| Vanilla Extract 🌿 | 1 tbsp | Pure alcohol-free preferred |
| Graham Cracker Crumbs 🍪 | 1 ½ cups | Fine, for classic crust |
| Unsalted Butter 🧈 | ½ cup | Melted, for crust binding |
| Powdered Sugar 🍚 | 2 tbsp | For dusting crust |
| Salt 🧂 | ¼ tsp | Fine sea salt |
| Cocoa Powder 🍫 | 2 tbsp | Unsweetened, for garnish |
| Fresh Berries 🍓 | 1 cup | Optional, for topping |
The cream cheese is non-negotiable here—Philadelphia brand is the gold standard, but any full-fat block works if you're in a pinch. Grab the 8 oz packages from the dairy aisle, not the tubs. For the chocolate, Ghirardelli or Lindt bars melt beautifully, but store-brand semisweet gets the job done. The key is 60-70% cacao—anything higher gets too bitter for this balance. I always buy extra chocolate because it's impossible to resist once you start chopping. The whipped cream needs to be cold—pull it from the fridge right before whipping, and use a hand mixer for 2-3 minutes
No heavy cream? Whipped topping from a can works in a bind, but it won't be as light. Short on graham crackers? Crush vanilla wafers or shortbread cookies for a different twist. The cocoa powder should be unsweetened Dutch-processed—it's smoother and less bitter than natural. For the crust, I like toasting the crumbs with the melted butter for about 2 minutes in the oven—just until fragrant. That extra step makes the crust taste like it came from a bakery. And if you're feeling fancy, add a tablespoon of espresso powder to the chocolate for deeper flavor. This pie is a fridge staple—keeps 5 days covered tightly. The filling firms up as it chills, so let it sit at least 4 hours before slicing. For gifting, wrap individual slices in parchment and tie with ribbon. The berries? Add them just before serving—they get soggy if mixed in too early. If you're prepping ahead, assemble the pie 1 day in advance for the best texture. Trust me, the wait is worth it.
Why You'll Love This Recipe
- Here’s what sold me: that first bite of dark chocolate chunks melting into the velvety cream cheese filling, all while the sugar keeps it just sweet enough. It’s decadent, but somehow makes me feel like I’m treating myself and my taste buds at the same time.
- I’ll be real: this pie disappears fast, but the good news is, it keeps beautifully in the fridge for days. Slice it up for breakfast (yes, really), pack it in lunches, or just eat the whole thing in one sitting—no judgment here. Plus, the ingredients won’t break the bank, so you can make it again next week.
Step-by-step instructions for Philadelphia cream cheese chocolate pie
Here's how to create a luscious, no-bake pie with rich ganache swirls and a buttery crust.
Prepare the Crust
In a medium bowl, combine the 1.5 cups graham cracker crumbs with the 0.5 cup melted unsalted butter. Mix until the crumbs are evenly moistened and the mixture holds together when pressed. I like to press it firmly with my fingers to ensure no dry spots remain.
Transfer the mixture to a 9-inch pie dish and press it evenly along the bottom and up the sides, creating a smooth, even layer. Use a glass to gently compact the crust, especially along the edges. Chill in the refrigerator for 15 minutes while you prepare the filling—this helps it hold its shape when you add the ganache.
Make the Ganache Filling
Chop the 12 oz dark chocolate bars into small, even pieces. In a heatproof bowl, combine the chocolate with the 1.5 cups heavy whipping cream and let it sit for 2 minutes to allow the cream to slightly warm the chocolate. This step ensures the chocolate melts smoothly without seizing.
Place the bowl over a pot of simmering water (double boiler method) and stir gently until the chocolate and cream are fully melted and combined into a glossy, thick mixture. Remove from heat and stir in the 0.5 cup granulated sugar and 1 tbsp vanilla extract until smooth. Let the mixture cool slightly—it should be thick enough to hold its shape but still pourable.
Whip the Cream Cheese Layer
In a separate large bowl, beat the 16 oz Philadelphia cream cheese with an electric mixer on medium speed until completely smooth and creamy, about 2-3 minutes. This step is crucial for avoiding lumps, so don't rush it. Gradually add the 2 tbsp powdered sugar and 0.25 tsp salt, mixing until fully incorporated.
Increase the mixer speed to high and gradually add the cooled ganache mixture in a slow, steady stream. Mix until fully combined and smooth, about 1-2 minutes. The mixture should be thick but still spreadable—this is your creamy filling layer. Taste and adjust sweetness if needed, though the ganache should already be balanced.
Assemble and Swirl the Pie
Pour the cream cheese mixture over the chilled crust, spreading it evenly with a spatula. To create those signature swirls, use the back of a spoon to gently drag lines through the filling, creating a marbled effect. Don't overmix—just enough to create a pretty pattern without breaking the layers.
Return the pie to the refrigerator and let it set for at least 4 hours, or until fully firm. I like to place it in the freezer for 1 hour if I'm in a hurry—just make sure it's completely set before slicing. This chilling time is what transforms the filling from liquid to a perfect, sliceable texture.
Garnish and Serve
Once the pie is fully set, dust the top with 2 tbsp cocoa powder using a fine-mesh sieve for an elegant finish. For extra flair, arrange the 1 cup fresh berries on top just before serving. The berries add a fresh contrast to the rich chocolate and cream cheese.
Slice with a sharp knife dipped in hot water for clean cuts. Serve chilled—this pie tastes best straight from the refrigerator, with the ganache swirls visible in every bite. Store leftovers covered in the fridge for up to 3 days, though I doubt it'll last that long!
Pro Tips For Making Philadelphia Cream Cheese Chocolate Pie
- Temper the Cheese: Let that cream cheese sit at room temperature for at least 30 minutes before mixing—no, don’t microwave it. Cold lumps make for a grainy filling, and nobody wants to scrape gunk out of their pie later. I learned this after making a lumpy mess that looked like it had been blended with gravel.
- Melt Chocolate Slowly: Chop those dark chocolate bars into small, even pieces before melting them with the cream mixture. If you toss in full bars, you’ll end up with uneven heat distribution—some chunks stay rock-hard while others turn greasy. A double boiler or microwave in 20-second bursts keeps it smooth and silky.
- Whip Cream to Stiff Peaks: Don’t skimp on whipping the heavy cream—stop only when you can hold the beaters upside down and have the peaks stay put. Soft peaks fold in but collapse later, leaving you with a soggy topping. I used to rush this, and the pie would weep like a bad mascara job.
- Chill the Filling Firm: Pop the cream cheese-chocolate mixture in the fridge for at least 2 hours before assembling the pie. This isn’t just about setting the texture—it’s about preventing a melty, runny disaster when you slice it. Warm filling = a greasy, sad pie. Trust the process.
Serving suggestions for this recipe
Classic Presentation
Serve your pie on a chilled glass platter with a dusting of unsweetened cocoa powder sifted through a fine-mesh sieve for an elegant finish. I like to arrange slices on a white marble slab or ceramic plate to make the dark chocolate swirls pop against the light background.
For a restaurant-worthy touch, add a few fresh raspberries or blackberries around the pie to complement the rich flavors. 🍫
Warm Coffee Pairing
This pie is at its best with a hot cup of coffee—I reach for a dark roast like Peet’s Major Dickason’s Blend or Starbucks Sumatra to cut through the richness. The natural acidity of the coffee balances the sweetness of the cream cheese and chocolate.
For a cozy touch, serve with a whipped cream dollop on the side for guests to add to their coffee or pie slice.
Whipped Cream Topping
Just before serving, whip ½ cup heavy whipping cream with 1 tbsp powdered sugar until soft peaks form. Spoon dollops over each slice for a light, airy contrast to the dense filling.
I also like to add a pinch of vanilla extract and a sprinkle of crushed graham crackers on top for extra crunch and flavor. This step makes the pie feel extra indulgent without overpowering the original flavors. 🥛
Caramel Drizzle
For a gourmet upgrade, drizzle warm caramel sauce over the pie slices just before serving. I use store-bought caramel like Smucker’s or homemade with ½ cup brown sugar, ¼ cup heavy cream, and a pinch of sea salt.
The salty-sweet caramel adds another layer of complexity that pairs beautifully with the tangy cream cheese. Let the caramel cool slightly before drizzling to prevent melting the pie too quickly.
Ice Cream Scoop
Serve individual slices with a small scoop of vanilla ice cream on the side for dipping. The cold ice cream contrasts perfectly with the room-temperature pie, creating a fun, interactive dessert experience.
I recommend Häagen-Dazs Vanilla Bean or Ben & Jerry’s Phish Food for a nostalgic touch. For a lighter option, try coconut sorbet to balance the richness. 🍦
Seasonal Fruit Twist
In warmer months, swap berries for sliced peaches or mango to add a tropical vibe. For fall, use roasted pears or cranberries to bring in seasonal flavors. I also love adding a mint leaf garnish for a refreshing contrast.
The key is to keep the fruit fresh and add it just before serving to maintain texture and presentation. This customization makes the pie feel special for any occasion. 🍓
Nutrition facts
Frequently asked questions
Can I make this pie without a graham cracker crust?
For a buttery twist, use 1 cup crushed vanilla wafers or shortbread cookies mixed with ½ cup melted butter instead. For a no-bake option, try a crushed Oreo crust—just add 1 tbsp cocoa powder to the crumbs for extra chocolate flavor. Press firmly into the pie dish and chill for 15 minutes before adding the filling.
Why did my ganache turn grainy?
Grainy ganache usually means the chocolate didn't melt evenly or the cream was too hot. Always use a double boiler method and stir gently until smooth. If it cools too quickly, reheat with 1 tsp heavy cream per 4 oz chocolate until glossy again. For extra insurance, chop chocolate into even small pieces before melting.
How do I adjust this for a gluten-free diet?
Replace graham crackers with gluten-free digestive biscuits or crushed gluten-free shortbread. For the crust, mix 1.5 cups gluten-free crumbs with ½ cup melted butter and press firmly. The filling remains naturally gluten-free—just ensure all chocolate and vanilla extracts are certified GF. Test with a small batch first to check texture.
Can I make this pie ahead of time?
This pie actually tastes better after 24 hours in the fridge! Assemble it a day in advance for perfect texture. Store covered tightly for up to 5 days—just let it sit at room temperature for 10 minutes before slicing. For gifting, wrap individual slices in parchment and tie with ribbon. The flavors meld beautifully over time.
What's the best way to reheat leftover slices?
This pie isn't meant to be reheated—it's designed to be served chilled! However, if you must warm a slice, microwave it for 10-15 seconds on low power (30% setting) to soften the filling slightly. For a restaurant-style experience, serve with a small scoop of ice cream** on the side instead. The contrast is what makes this dessert special!