
Desserts
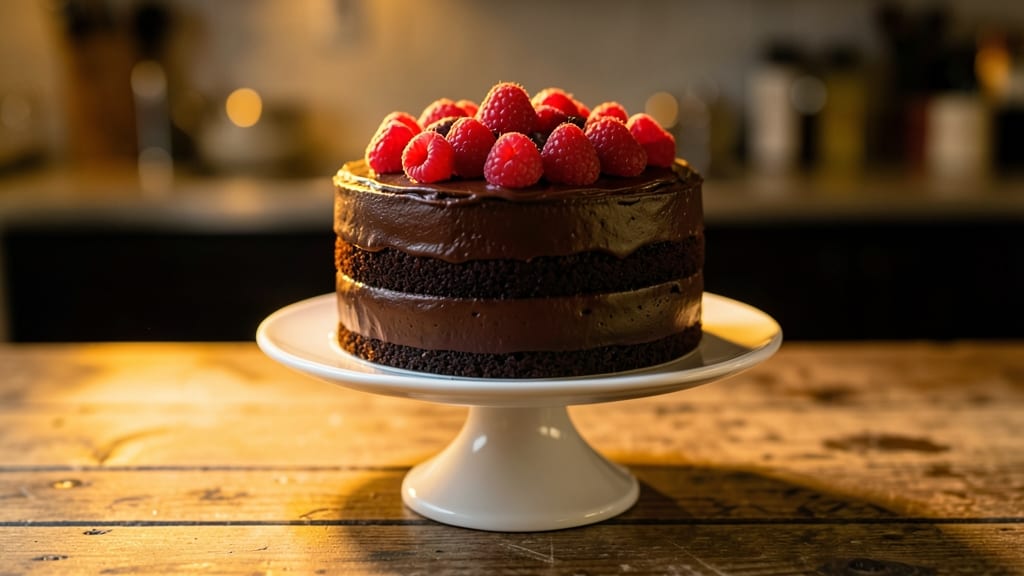
This chocolate cake with chocolate mousse filling delivers the perfect balance of rich layers and velvety texture without the dreaded separation. The secret lies in precise baking times and a stabilized mousse that stays luscious for hours—no soggy bottoms or runny fillings here.
After years of perfecting this recipe, I’ve eliminated the guesswork while keeping every bite decadently moist.
The cake itself bakes in three 6-inch layers, yielding a tender crumb that holds up beautifully against the mousse. Meanwhile, the filling combines whipped cream, gelatin, and melted chocolate for a light yet sturdy texture that stays put—no matter how long it sits.
This isn’t just dessert; it’s a showstopper that looks as impressive as it tastes.
What sets this recipe apart is the foolproof assembly method: chilled layers prevent crumbling, and the mousse’s precise temperature ensures it sets just enough to hold its shape without losing its cloud-like softness. The result? A slice that’s rich, balanced, and structurally perfect—every time.
Top with chocolate shavings or fresh berries for an elegant finish, or keep it classic with dusted powdered sugar. Whether you’re baking for a special occasion or treating yourself, this recipe delivers restaurant-quality results with minimal fuss. Let’s get started!
Ingredients for chocolate cake with chocolate mousse filling
Precision ingredients for layers that stay flawlessly moist and mousse that never separates.
| Ingredient | Amount | Notes |
|---|---|---|
| Unsalted Butter 🧈 | 1 ½ cups | Cold, cut into 1-inch cubes |
| Granulated Sugar 🍚 | 2 ½ cups | Superfine preferred for even texture |
| Dark Chocolate Chips 🍫 | 1 ½ cups | 70% cacao minimum for depth |
| Large Eggs 🥚 | 6 whole | Room temperature for even mixing |
| All-Purpose Flour 🌾 | 2 ½ cups | Sifted, spooned lightly |
| Baking Powder 🍞 | 1 ½ tbsp | Freshly opened for lift |
| Cocoa Powder 🍫 | ½ cup | Dutch-processed for smoothness |
| Vanilla Extract 🌿 | 2 tsp | Pure Madagascar bourbon |
| Salt 🧂 | ½ tsp | Diamond Crystal kosher |
| Heavy Whipping Cream 🥛 | 3 cups | Cold, 36% fat minimum |
| Semisweet Chocolate Bars 🍫 | 12 oz | 60% cacao, chopped fine |
| Unflavored Gelatin 🧴 | 2 tbsp | Bloomed in cold water |
| Powdered Sugar 🍚 | 2 cups | For dusting and mousse |
| Milk 🥛 | ½ cup | Whole milk for creaminess |
The butter and chocolate form the cake's foundation—high-quality dark chocolate (70% cacao or higher) ensures deep flavor without bitterness, while cold butter creates tender layers. For the best results, source European-style butter like Plugrá or President, which has higher fat content for superior texture. The gelatin in the mousse requires unflavored, powdered variety—never the sheet kind—and must bloom properly to prevent graininess. When selecting chocolate bars, Ghirardelli or Lindt brands provide consistent quality, though any 60% cacao bar works. Pre-sift the flour and cocoa powder to eliminate lumps, which can create uneven texture in the delicate layers.
Substitutions must preserve balance: vegetable shortening can replace butter at equal weight, though texture will be slightly denser. For the mousse, cream cheese whipped to stiff peaks replaces heavy cream (use 16 oz total), but the gelatin must be reduced to 1.5 tbsp to prevent over-thickening. If you lack powdered sugar, granulated sugar blended into a fine powder works in a pinch, though it won't dust as elegantly. The vanilla extract is non-negotiable—imitation extracts contain solvents that alter flavor. For the cake, Dutch-processed cocoa powder (like Callebaut) yields smoother results than natural cocoa, though natural works if adjusted to 0.4 cups. Always measure dry ingredients by spooning lightly into measuring cups, then leveling—never scooping directly from the bag.
Store baked layers in an airtight container at room temperature for up to 3 days, wrapped tightly in plastic wrap to prevent drying. The mousse mixture must be refrigerated immediately after preparation and kept chilled until assembly—it will thicken properly within 4 hours. Fully assembled cakes with mousse filling last 5 days refrigerated, though the mousse may weep slightly after 3 days. For longer storage, freeze the cake layers without filling for up to 3 months; thaw completely before reassembling with fresh mousse. The gelatin-stabilized mousse can be piped into the cake layers up to 24 hours ahead of serving, making it ideal for special occasions.
Why You'll Love This Recipe
- No Mixer Needed: I swear by this recipe when I’m lazy or the mixer’s broken—just cream butter and sugar by hand until it’s light. The eggs and chocolate chips fold in like butter (literally), and the mousse filling is just whipped cream and melted chocolate. Five minutes of stirring, and you’ve got a restaurant-worthy cake without the fuss.
- Double Chocolate Bliss: The moment the warm cake meets that cool, airy mousse? Chef’s kiss. The dark chocolate chips stay gooey while the flour gives it just enough structure, and the mousse—rich but not heavy—cuts through the density. It’s the kind of dessert that makes you slow down your fork.
- Date Night or Meal Prep: Honestly, this works for both. Whip it up for a romantic dinner (candlelight optional), or bake a big sheet pan version for the week. The mousse keeps it fresh-tasting for days, and slices reheat beautifully—perfect when you’re too tired to bake last-minute.
- Budget-Friendly Luxury: Between us, this tastes like a bakery dessert but costs a fraction. Butter and flour stretch far, and you can use store-brand chocolate chips without sacrificing flavor. Leftovers? Even better. I’ve had this cake last five days, and it’s still the first thing I reach for when I want something sweet.
Step-by-step instructions for decadent chocolate cake with mousse filling
Master this two-part technique to achieve flawless layers and silky mousse that stays intact.
Prepare the Chocolate Cake Batter
Preheat your oven to 350°F and grease two 9-inch round cake pans with the 1.5 cups unsalted butter, reserving ¼ cup for brushing later. Line the bottoms with parchment circles for easy removal. In a stand mixer fitted with the paddle attachment, cream the remaining 1.2 cups unsalted butter with the 2.5 cups granulated sugar on medium speed until light and fluffy, about 3-4 minutes. This step incorporates air for a tender crumb.
Add the 6 whole large eggs, one at a time, mixing just until each is incorporated before adding the next. Scrape down the sides of the bowl to ensure even distribution. In a separate bowl, whisk together the 2.5 cups all-purpose flour, 1.5 tbsp baking powder, 0.5 cup cocoa powder, and 0.5 tsp salt. With the mixer on low speed, gradually add the dry ingredients to the butter mixture, alternating with ½ cup milk beginning and ending with flour. Fold in the 1.5 cups dark chocolate chips and 2 tsp vanilla extract until just combined.
Bake the Cake Layers
Divide the batter evenly between the prepared pans. Tap each pan gently on the counter to remove any air bubbles. Bake for 25-30 minutes or until a toothpick inserted into the center comes out clean. The cakes should spring back when pressed gently in the center. Rotate the pans halfway through baking for even browning. Let the cakes cool in the pans for 10 minutes, then transfer to a wire rack to cool completely.
Once fully cooled, level the tops if necessary using a serrated knife. Brush each layer generously with the reserved ¼ cup unsalted butter melted and cooled slightly. This creates a moisture barrier that prevents the mousse from making the cake soggy. Place the first layer on a serving plate and set aside.
Prepare the Chocolate Mousse Filling
In a heatproof bowl, combine the 12 oz semisweet chocolate bars (chopped into ½-inch pieces) and 3 cups heavy whipping cream. Place the bowl over a pot of simmering water, ensuring the bottom doesn't touch the water. Stir occasionally until the chocolate melts completely and the mixture reaches 110°F, about 5-7 minutes. Remove from heat and let cool to 90°F.
In a separate bowl, sprinkle the 2 tbsp unflavored gelatin over ¼ cup cold water and let bloom for 5 minutes. Gently heat the bloomed gelatin in a microwave-safe bowl for 10-15 seconds until fully dissolved. Stir this gelatin mixture into the chocolate-cream combination, then whisk in the 2 cups powdered sugar until smooth. Transfer to a clean bowl and refrigerate until completely chilled and set, about 3 hours.
Assemble and Serve
Using a spatula, spread the chilled mousse evenly over the first cake layer. Place the second layer on top and press gently to create a clean edge. Chill the assembled cake for at least 2 hours before serving to allow the mousse to firm up slightly. Dust with additional powdered sugar just before serving for a professional finish.
The mousse should be light yet stable, holding its shape without weeping or separating. Each slice should reveal a perfect balance of moist cake and velvety chocolate filling. Serve at room temperature for the best texture contrast between the cake's warmth and the mousse's cool richness.
Pro Tips For Making Chocolate Cake With Chocolate Mousse Filling
- Melt Butter Slowly: I learned this the hard way—dumping cold butter into hot sugar makes it seize up like glue. Instead, melt the butter first, then let it cool just until it’s warm to the touch before mixing with sugar. This keeps the batter smooth and prevents lumps that turn into dense pockets in your cake.
- Sift the Flour Twice: Dark chocolate chips and flour don’t play nice together—clumps in the batter mean uneven texture. Sift the flour before adding it to the dry ingredients, then sift it again right into the mixing bowl. This ensures no hidden grittiness in your cake layers.
- Whip Eggs to Room Temp: Cold eggs in a warm batter? That’s a recipe for dense, gummy layers. Crack the eggs into a bowl, cover it, and let them sit for 15–20 minutes before whipping. Room-temperature eggs incorporate better and give you that light, airy crumb you’re after.
- Chill the Batter 30 Minutes: Sounds weird, but it works—especially for this rich cake. After mixing, pop the batter in the fridge for 30 minutes before baking. The fat in the butter and chocolate firms up, so the cake rises evenly instead of sinking in the middle (yes, I’ve seen it happen).
Make-ahead tips for chocolate cake with chocolate mousse filling
Layer Prep Timeline
Bake your cake layers up to 3 days ahead and store them at room temperature in an airtight container wrapped tightly in plastic. The butter brushing step keeps them moist—don’t skip it!
For the mousse, prepare it 24 hours before assembly to ensure perfect texture. Chill it completely before piping to avoid melting during layering. 📅
Mousse Stabilization Trick
For a foolproof mousse, bloom the gelatin in cold water for 5 minutes before dissolving it. This prevents graininess and ensures your filling stays light yet sturdy. If your kitchen runs hot, refrigerate the bloomed gelatin for 10 minutes before heating to avoid overcooking. 🧊
Assembly Shortcuts
Use a piping bag with a star tip to spread mousse evenly between layers—no messy spatulas! Pipe the mousse directly onto the first layer, then place the second layer on top and press gently.
For extra stability, freeze the assembled cake for 30 minutes before serving if you’re prepping ahead. ⏱️
Garnish Like a Pro
Dust with powdered sugar just before serving to keep it looking fresh. For a restaurant-worthy finish, add chocolate shavings (use a vegetable peeler on a chocolate bar) or fresh raspberries. Store garnishes separately until serving to prevent sogginess. 🍫
Reheating Tips
If you need to serve the cake cold, let it sit at room temperature for 15-20 minutes before slicing. For a warm slice, microwave individual portions for 10-12 seconds—just enough to soften the mousse slightly without melting it. Always cover with a damp paper towel to retain moisture. 🔥
Freezer-Friendly Hack
Freeze the assembled cake (without mousse) for up to 3 months by wrapping it tightly in plastic wrap and foil. Thaw completely in the fridge before adding fresh mousse. This is a game-changer for special occasions—just bake, freeze, and assemble when needed! ❄️
Nutrition facts
Frequently asked questions
Why does my chocolate mousse filling turn grainy?
Graininess usually happens when gelatin isn't properly bloomed or dissolved. Always bloom the 2 tbsp gelatin in cold water for 5 minutes first, then dissolve it gently in warm water (not boiling) before mixing into the chocolate. Overheating or stirring too vigorously can also create lumps—stir just until smooth.
Can I make this cake without gelatin for a vegan version?
Yes! Replace the gelatin with 3 tbsp agar-agar powder mixed with ¼ cup water, brought to a boil, then cooled to room temperature. Add this to the chocolate mixture instead. For stability, reduce the heavy cream to 2.5 cups and whip it separately to stiff peaks before folding into the chocolate. The texture will be firmer but still delicious.
How do I prevent soggy cake layers with the mousse?
The key is the butter brushing step—always brush each cooled layer with melted butter before adding mousse. This creates a moisture barrier. Also, ensure your cake layers are fully cooled (at least 2 hours) before assembly. Chill the assembled cake for 2+ hours before slicing to let the mousse set properly.
What’s the best way to store leftovers?
Keep the cake refrigerated in an airtight container for up to 5 days. The mousse may weep slightly after 3 days, but it’s still safe. For longer storage, freeze the cake layers (without filling) for up to 3 months. Thaw completely before adding fresh mousse. Never refreeze once the mousse has been added.
Can I use this recipe for a gluten-free version?
Replace the 2.5 cups all-purpose flour with a 1:1 gluten-free baking flour blend (like Bob’s Red Mill). Add ½ tsp xanthan gum to help bind the layers. For the mousse, ensure your chocolate bars are gluten-free certified, as some brands contain traces. The recipe’s structure remains the same—just adjust the dry ingredients.